date: 2023-12-22 09:44:42
tags: malloc memory check
- 代码
#include <iostream>
#include <malloc.h>
using namespace std;

int main()
{
  // 调用mallinfo()函数获取堆内存的统计信息
  struct mallinfo mi;
  int *a[10];
  size_t old=0;
  size_t delta=0;
  for(int i=0;i<10;i++)
  {
    a[i]=0;
    a[i] = (int*)malloc(40000000);
    mi = mallinfo();
    // 计算堆内存的已使用大小
    size_t heap_used = mi.arena + mi.hblkhd;
    // 打印堆内存的统计信息
    delta = heap_used - old;
    cout << "heap_used: " << heap_used << " bytes| delta: " << delta << endl;
    cout << mi.arena<<" "<<mi.ordblks<<" "<<mi.smblks<<" "<<mi.hblks<<endl;
    old = heap_used;
  }
  return 0;
}
- 输出结果
heap_used: 40214528 bytes| delta: 40214528
212992 1 0 1
heap_used: 80216064 bytes| delta: 40001536
212992 1 0 2
heap_used: 120217600 bytes| delta: 40001536
212992 1 0 3
heap_used: 160219136 bytes| delta: 40001536
212992 1 0 4
heap_used: 200220672 bytes| delta: 40001536
212992 1 0 5
heap_used: 240222208 bytes| delta: 40001536
212992 1 0 6
heap_used: 280223744 bytes| delta: 40001536
212992 1 0 7
heap_used: 320225280 bytes| delta: 40001536
212992 1 0 8
heap_used: 360226816 bytes| delta: 40001536
212992 1 0 9
heap_used: 400228352 bytes| delta: 40001536
212992 1 0 10
date: 2023-03-30 15:26:14
tags: SACA FORTRAN CRTS
主核代码 main.f90
program main
use utility
implicit none
integer :: i, j
integer :: N = 10
integer, pointer :: matrix_A(:,:)
integer, pointer :: vector_B(:)
integer, pointer :: vector_C(:)
type(ParaType)::para
integer, external :: slave_func
allocate(matrix_A(N,N), vector_B(N), vector_C(N))
para%N = N
para%matrix_A => matrix_A
para%vector_B => vector_B
para%vector_C => vector_C
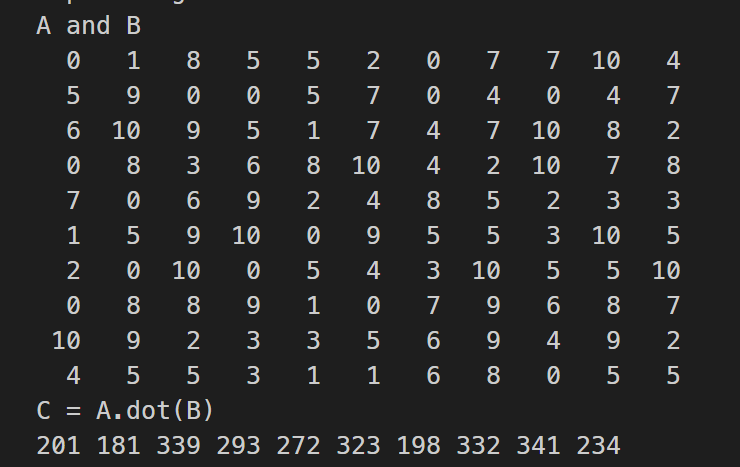
print *, "A and B"
do i = 1, N
do j = 1, N
matrix_A(j,i) = floor(11*rand())
write(*, "(I4)", advance="no") matrix_A(j,i)
end do
vector_B(i) = floor(11*rand())
write(*, "(I4)", advance="no") vector_B(i)
print *
end do
call CRTS_Init()
call CRTS_athread_spawn(slave_func, para)
call CRTS_athread_join()
print *, "C = A.dot(B)"
do i = 1, N
write(*, "(I4)", advance="no") vector_C(i)
end do
print *
end program main
工具模块 utility.f90
module utility
    implicit none
    type, public :: ParaType
        integer :: N
        integer,pointer :: matrix_A(:,:)
        integer,pointer :: vector_B(:)
        integer,pointer :: vector_C(:)
    end type ParaType
interface
    integer function CRTS_smng_get_tid()
    end function CRTS_smng_get_tid
end interface
contains
end module utility
从核代码 slave.f90
subroutine slave_func(para)
    use utility
    implicit none
    type(ParaType), intent(in) :: para
    integer :: N
    integer, pointer :: matrix_A(:,:)
    integer, pointer :: vector_B(:)
    integer, pointer :: vector_C(:)
    integer :: i, j
    integer :: myid
    integer :: tmp
    myid = CRTS_smng_get_tid()
    N = para%N
    if(myid < N) then
        matrix_A => para%matrix_A
        vector_B => para%vector_B
        vector_C => para%vector_C
        tmp = 0
        do i = 1,N
            tmp = tmp + matrix_A(i, myid+1) * vector_B(i)
        end do
        vector_C(myid+1) = tmp
    end if
end subroutine slave_func
Makefile
FC = swgfortran
main: main.o slave.o utility.o
	$(FC) -mhybrid $^ -o $@
main.o: main.f90 utility.o
	$(FC) -mhost -c $<
slave.o: slave.f90 utility.o
	$(FC) -mslave -c slave.f90
utility.o: utility.f90
	$(FC) -c $<
run:
	bsub -I -b -q q_linpack -cgsp 64 -n 1 ./main
clean:
	rm -rf *.o main *.mod
程序输出
date: 2022-08-22 14:34:18
tags:
cblas_dgemm参数详解
[dragon](mailto: wauqas@gmail.com) 22-8-15
代码
#include <cblas.h>
#include <stdio.h>

int main()
{
  int i = 0;
  double A[6] = {1.0, 10.0, 20.0, 30.0, 40.0, 50.0};
  double B[6] = {1.0, 10.0, 20.0, 30.0, 40.0, 60.0};
  double C[9] = {.5, .5, .5, .5, .5, .5, .5, .5, .5};
  cblas_dgemm(CblasColMajor, CblasNoTrans, CblasTrans, \
              3, 3, 2, 1, A, 3, B, 3, 0, C, 3);
  for (int j = 0; j < 3; j++)
  {
    for (i = 0; i < 3; i++)
      printf("%lf ", C[i*3+j]);
    printf("\n");
  }
  return 0;
}
解释
void cblas_dgemm(
    	OPENBLAS_CONST enum CBLAS_ORDER Order, //行列主序
        OPENBLAS_CONST enum CBLAS_TRANSPOSE TransA, //矩阵A转置
        OPENBLAS_CONST enum CBLAS_TRANSPOSE TransB, //矩阵B转置
        OPENBLAS_CONST blasint M, //op(A)的行数
        OPENBLAS_CONST blasint N, //op(B)的列数
        OPENBLAS_CONST blasint K, //op(A)的列数和op(B)的行数
        OPENBLAS_CONST double alpha, //A的缩放
        OPENBLAS_CONST double *A, //matrix A
        OPENBLAS_CONST blasint lda, //A的第一维度,跟主序有关
       	OPENBLAS_CONST double *B, //matrix B
        OPENBLAS_CONST blasint ldb, //B的第一维度
        OPENBLAS_CONST double beta, //C 的缩放
        double *C, //matrix C
        OPENBLAS_CONST blasint ldc //C的第一维度
);
最终结果为$C=alpha*op(A)op(B)+betaC$
date: 2022-08-22 16:39:25
tags: cuda
CUDA
cuda program kernel function:
__global__ void functionName(){}
or
void __global__ functionName(){}
Hello World
Hello.cu
```c++ #includeCompile:
nvcc Hello.cu -o Hello
Execute:
./Hello
Result:
Hello World
Hello World
Hello World
Hello World
why? <<<2,2>>>
CUDA kernel run in Device. We should realise the differences of Host datas with Device datas.
Let's see the CUDA functions !
cudaMalloc(
					(void\*\*)&ptr,  int \*ptr -> (void\*\*)&ptr

					size, sizeof(ptr_type);

				)
ptr will get some places from Device
cudaMemcpy(
				dst, date to dst

				src, date from src

				size, how many bytes

				kind,where to where(cudaMemcpyHostToDevice,cudaMemcpyDeviceToHost and ......)

				)
cudaDeviceSynchronize()
Wait operate in Device finish
GPU has lot's of same things with CPU
different kinds of memory is one of the same things.
dynamic common Element
```c++ double *a; int M=1000; cudaMalloc((void**)&a,M); cudaMemcpy(....); kernel<<static global Element
global and static__device__ double a[5];
__device__ int b;
compiler should know the size of static global Element,and we need't be used by arg-way
needn't kernel<<<1,1>>>(a);
constant Element by arg-way
```c++ int a=1; kernel<<<1,1>>>(a); ```read-only and max size is 4KB
constant Element by __constant__
```c++ __constant__ int a=1; ```read-only and max size is 64 in most NVIDIA GPU
How to copy datas from/to constant Element ?
cudaMemcpyFromSymbol(
											dst, datas to dst

											src, datas from src

											copykind, cudaMemcpyDeviceToHost

											)
cudaMemcpyToSymbol(
										dst, datas to dst

										src, datas from src

										copykind, cudaMemcpyHostToDevice

										)
dynamic shared memory
```c++ __global__ void kernel(){ int n=10; __shared__ int a[n]; } ```read and write, 64KB per block. same block with same shared memory value
static shared memory
outside:kernel<<<1,1,sharedMemorySize>>>()
inside:
extern __shared__ double a[]
not *a, pointer isn't array
register memory
fast and small__global__ void kernel(){
int a=1;
const int b=1;
}
dynamic unified memory
```c++ double *x,*y; const int M=sizeof(double)*10000; cudaMallocManaged((void**)&x,M); cudaMallocManaged((void**)&y,M); *x=1; *y=2; kernel<<static unified memory
```c++ __device__ __managed__ int ret[1000]; __device__ __managed__ int a; int main(){ kernel<<Free Memory
`cudaFree(void* ptr)`Atoi operate
look like synchronize, but really without synchronizeCUDA Stream
Let's see the functions!type: cudaStream_t stream
cudaStreamCreate(&stream)
cudaStreamDestory(stream)
cudaStreamSynchronize(stream), wait stream finish
cudaStreamQuery(stream), check stream finish or not, cudaSuccess or cudaErrorNotReady
run in stream : kernel<<<gridSize, blockSize,shared_size,stream>>>();
cudaMemcpyAsync(
								void *dst

								const void *src

								size_t count

								enum cudaMemcpyKind kind

								cudaStream_t stream, if you want to use default stream, by 0

								)
which datas can be MemcpyAsync ?
cudaMallocHost(void**ptr, size_t size)
cudaHostAlloc(void**ptr, size_t size,size_t flag)
if flag==cudaHostAllocDefault, cudaMallocHost equal to cudaHostAlloc
Free:cudaFreeHost(void* ptr)
date: 2022-08-23 14:52:12
tags: vscode fortran debug
please make sure you have gdb and gfortran
-
launch.json
{
    "version": "0.0.1",
    "configurations": [
        {
            "name": "Fortran Launch (GDB)",
            "type": "cppdbg",
            "request": "launch",
            "targetArchitecture": "x64",
            "program": "${workspaceRoot}\\${fileBasenameNoExtension}.exe",
            "miDebuggerPath": "D:\\cygwin64\\bin\\gdb.exe",
            "args": [],
            "stopAtEntry": false,
            "cwd": "${workspaceRoot}",
            "externalConsole": true,
            "preLaunchTask": "gfortran"
        }
    ] }
"miDebuggerPath" insert your gdb full path.
-
tasks.json
{
    "tasks": [
        {
            "label": "gfortran",
            "type": "shell",
            "command": "gfortran -o ${fileBasenameNoExtension}.exe  ${fileBasename} -g",
            "options": {
                "cwd": "${workspaceFolder}"
            },
            "group": {
                "kind": "build",
                "isDefault": true
            }
        },
  ],
    "version": "2.0.0"
}
configure finish
method of using
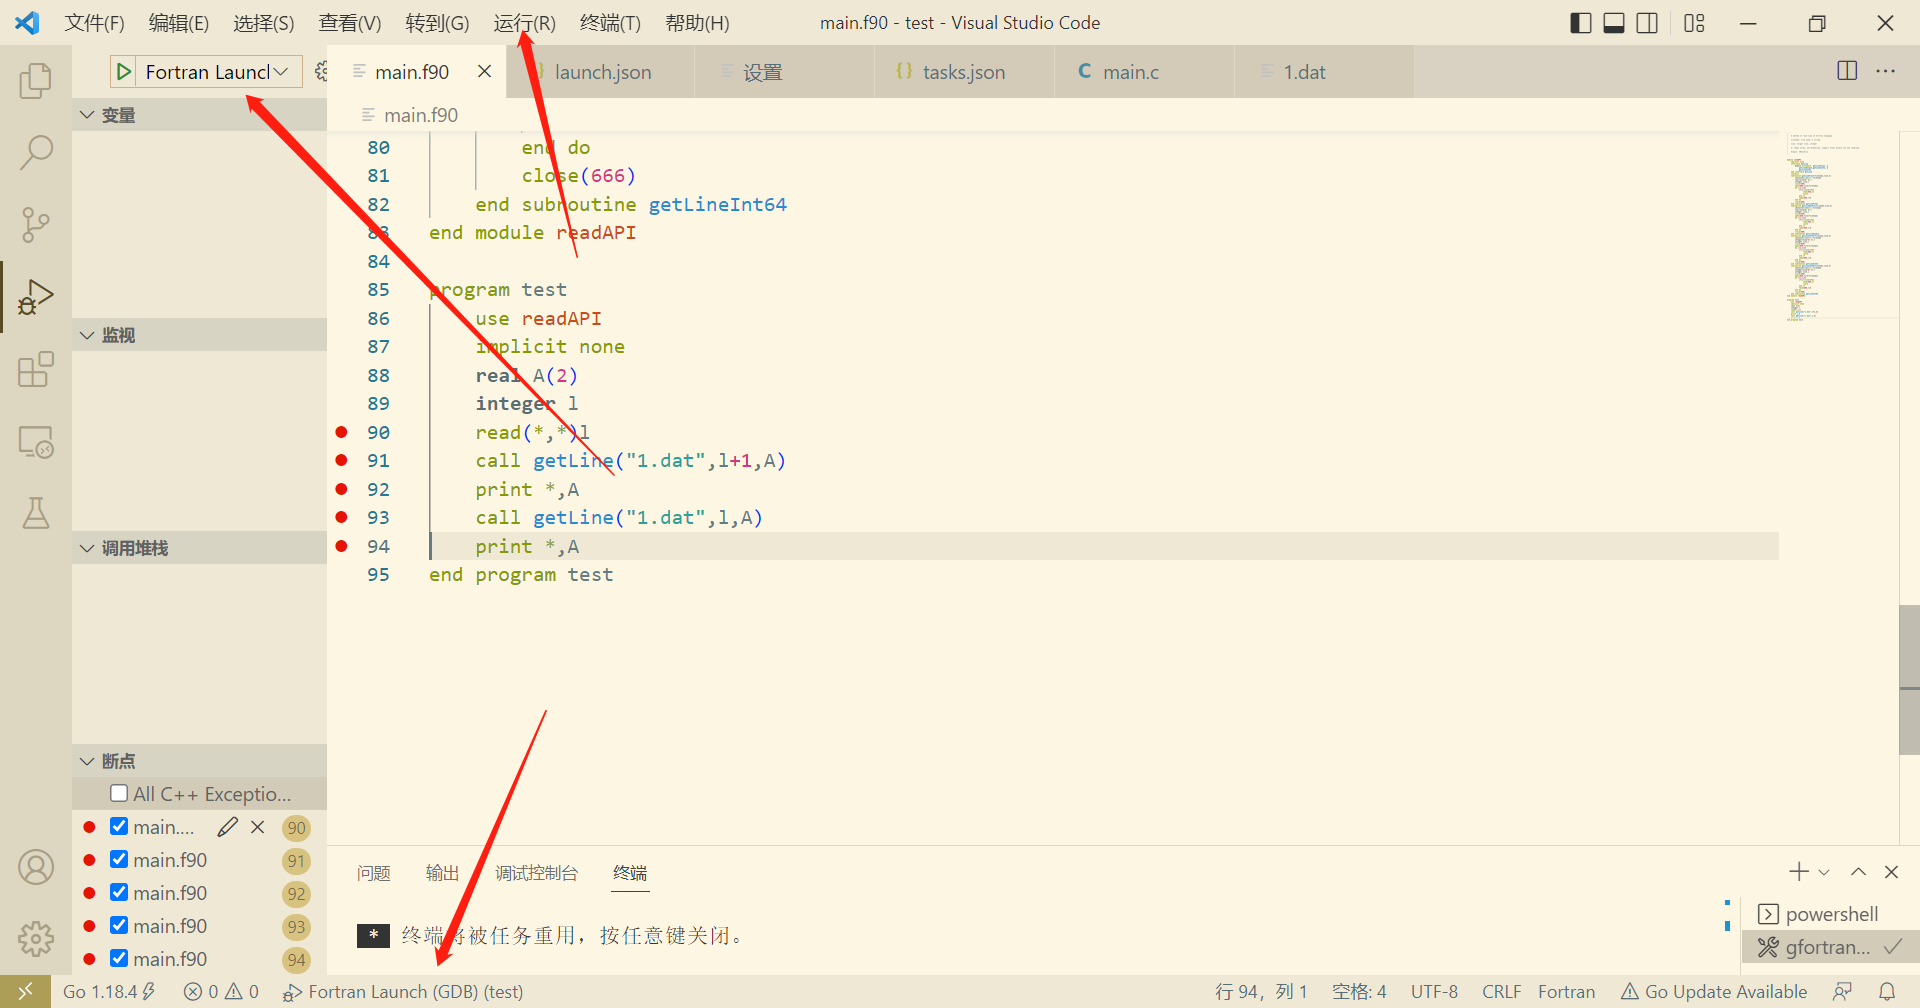
there are three or more ways to debug the example code.
you can also set some break points.
Wish you best.
date: 2023-03-02 15:12:08
tags: gpt python
在3月1日刚发布的gpt-3.5-turbo,学习一下它的调用方法
- 以post方法调用
import requests

url = 'https://api.openai.com/v1/chat/completions'

Question = input("Question:")

data = {"model": "gpt-3.5-turbo","messages": [{"role": "user", "content": Question}]}

headers = {
    'Authorization': 'Bearer sk-' #后面输入自己的api-key
}

response = requests.post(url, json=data, headers=headers)

if response.status_code == 200:
    x = response.json()
    print(x['choices'][0]['message']['content'])
else:
    print("error:",response.status_code)
启动程序之后输入问题然后发送请求。
- 以python openai模块调用
import openai
openai.api_key="sk-"
message=[]
while(True):
    Q = input("user:")
    message.append({"role":"user","content":Q})
    com=openai.ChatCompletion.create(model="gpt-3.5-turbo",messages=message)
    message.append({"role":"assistant","content":com.choices[0].message.content})
    print("assistant:",com.choices[0].message.content)
跟上面的代码功能有所不同的是,这个可以联系上下文,类似网页上与chatgpt对话的过程。 用户的角色设置为user,ai的角色设置为assistant。 目前不管是直接post请求还是用python的openai模块,都不需要连接外网,平时使用较为方便。
程序大小问题
在实际测试后发现:直接用post的版本,生成exe的大小在6M左右。而使用openai模块的版本,因为要打包openai模块,大小在70M左右。所以还是建议用post的版本 以下程序也可实现联系上下文
import requests

url = 'https://api.openai.com/v1/chat/completions'

headers = {
    'Authorization': 'Bearer sk-'
}

message=[]

while(True):
    Q = input("user:")
    message.append({"role":"user","content":Q})
    data = {"model": "gpt-3.5-turbo","messages": message}
    response = requests.post(url, json=data, headers=headers)
    if response.status_code == 200:
        x = response.json()
        print("assistant:",x['choices'][0]['message']['content'])
        message.append({"role":"assistant","content":x['choices'][0]['message']['content']})
    else:
        print("error:",response.status_code)
        break
date: 2022-08-23 11:10:23
tags: cuda cpp
make_unique_with_cuda
#include "stdio.h"
#include <memory>
namespace cuda
{
    template <typename T>
    [[nodiscard]] static auto malloc(std::size_t const size)
    {
        //nodiscard implies must use it return value, or will encounter an error
        static T *d{nullptr};
        cudaMalloc(&d, sizeof(T) * size);
        return d;
    }
    template <typename T>
    static void free(T *ptr)
    {
        if (ptr)
        {
            cudaFree(ptr);
            ptr=nullptr;
        }
    }
    template <typename T>
    [[nodiscard]] static auto makeUnique(std::size_t size)
    {
        return std::unique_ptr<T[], decltype(&free<T>)> { malloc<T>(size), free<T> };
    }
} // namespace name
__global__ void kernel(float3 *d)
{
    int id = threadIdx.x;
    // d[id].x=d[id].y=d[id].z=id*1.1;
    printf("%g\t%g\t%g\n", d[id].x, d[id].y, d[id].z);
}
void showh(float3 *d)
{
    for (int id = 0; id < 5; id++)
    {
        printf("%g\t%g\t%g\n", d[id].x, d[id].y, d[id].z);
    }
}
using namespace cuda;
int main(void)
{
    auto const count = 5;
    auto hp_points{std::make_unique<float3[]>(count)};
    for (int i = 0; i < count; i++)
    {
        hp_points[i].x=i*1.1;
        hp_points[i].y=i*1.1;
        hp_points[i].z=i*1.1;
    }
    // showh(hp_points.get());
    auto dp_points{cuda::makeUnique<float3>(count)};
    cudaMemcpy(dp_points.get(),hp_points.get(), //get() will return unique ptr's address
    sizeof(float3)*count,cudaMemcpyHostToDevice);
    kernel<<<1,5>>>(dp_points.get());
    cudaDeviceSynchronize();
    dp_points.~unique_ptr();
    return 0;
}
date: 2022-11-17 14:36:31
tags: makefile wildcard filter-out patsubst
文件列表
main.f90
makefile
sub1.f90
sub2.f90
sub3.f90
makfile代码
main = main.f90

SRC = $(wildcard *.f90)

SRC := $(filter-out $(main),$(SRC))

SRC := $(patsubst %.f90, %.o, $(SRC))

main:

    echo $(SRC)
- wildcard 在对变量调用时,保持通配符特性
- filter-out 过滤器,删除后面跟的第一个参数
- patsubst 将变量中元素根据参数替换,上述代码将所有.f90替换为.o
执行结果
$> make
echo  sub1.o  sub2.o  sub3.o
 sub1.o  sub2.o  sub3.o
date: 2023-03-13 15:50:12
tags:
MPI_Cart_Create
将一维的通信空间转为多维
接口
subroutine MPI_Cart_shift(comm, direction, disp, rank_source, rank_dest)
        integer,intent(in)  ::comm, 		!通信域
        integer,intent(in)  ::direction,    !维度序号
        integer,intent(in)  ::disp,		   	!偏移量
  		integer,intent(out) ::rank_source,	!向本进程发送数据的进程 如果没有则为-1
  	    integer,intent(out) ::rank_dest		!本进程发送数据的目的进程 如果没有则为-1
end subroutine MPI_Cart_shift
测试
- 查看period对网络生成的影响
program main
    use mpi
    integer ierr
    integer rank,size
    integer np_dim(2)
    logical period(2)
    integer mpi_world_cart
    integer src,dest
    np_dim=3
    period(1)=.false.
    period(2)=.true.
    call MPI_Init(ierr)
    call MPI_Cart_create( MPI_COMM_WORLD    &
                            , 2                 &
                            , np_dim            &
                            , period            &
                            , .false.           &
                            , mpi_world_cart    &
                            , ierr              &
                            )
    call MPI_Comm_rank(mpi_world_cart,rank,ierr)
    call MPI_Comm_size(mpi_world_cart,size,ierr)
    call MPI_Cart_shift(mpi_world_cart, 0, 1, src, dest,ierr)
    call MPI_Finalize(ierr)
    print *,rank,"of",size,"|",src,"of",dest,"|",(ierr==0)
end program main
输出
           6 of           9 |           3 of          -1 | T
           1 of           9 |          -1 of           4 | T
           2 of           9 |          -1 of           5 | T
           0 of           9 |          -1 of           3 | T
           5 of           9 |           2 of           8 | T 以此条为例,5从2接收,发送到8
           4 of           9 |           1 of           7 | T
           3 of           9 |           0 of           6 | T
           7 of           9 |           4 of          -1 | T
           8 of           9 |           5 of          -1 | T
第一维度的period设置为.false.,导致网络在第一维度不是环状的,而是线性的;
第二维度的period设置为.true.,导致网络在第二维度是环状的,最后一个进程的下一个进程是第一个进程。
这种设置方式会产生一个类似圆柱形的结构,圆柱的底是头尾连接的,圆柱的高是头尾分离的。
因为MPI_Cart_shift选取的维度是第一维度,且period(1)==.false.,所以0~2进程的src为-1,6~8进程的dest为-1。
以下是period(1)==.true.时程序的输出。
           0 of           9 |           6 of           3 | T
           6 of           9 |           3 of           0 | T
           8 of           9 |           5 of           2 | T 8从5接受,发送到2
           7 of           9 |           4 of           1 | T
           1 of           9 |           7 of           4 | T
           3 of           9 |           0 of           6 | T
           2 of           9 |           8 of           5 | T
           4 of           9 |           1 of           7 | T
           5 of           9 |           2 of           8 | T
MPI_Cart_Create函数的reorder参数是用来指定创建出来的Cartesian拓扑是否可以被重新排序的。具体来说,如果reorder参数被设置为1,那么MPI库就可以为了提高性能而重新排列进程的拓扑结构。如果reorder参数被设置为0,那么MPI库就必须按照进程的原始顺序来创建Cartesian拓扑结构。
当reorder参数被设置为1时,MPI库可以为了提高性能而重新排列进程的拓扑结构。例如,假设原始的进程布局如下所示:
0 1 2 3
4 5 6 7
8 9 10 11
如果reorder参数被设置为1,MPI库可以重新排列进程的拓扑结构,例如:
0 4 8 9
1 5 6 10
2 3 7 11
这样做的目的是为了使相邻的进程在物理空间中更接近,从而减少通信延迟。但是需要注意的是,重新排序进程的拓扑结构可能会影响到原始程序的正确性,因此在使用该特性时需要小心谨慎。
date: 2022-08-25 09:17:16
tags: openblas
OpenBlas-Make
environment:
- redhat
- gcc version 4.8.5 20150623 (Red Hat 4.8.5-36) (GCC)
build
make CC=gcc FC=gfortran make_NB_JOBS=1
make install PREFIX=<install_path>
if you don't make with suffix make_NB_JOBS, and has a old lapack in you machine,
openblas will generate before included lapack built, And won't call the old lapack lib.
test
#include <cblas.h>
#include <stdio.h>

int main()
{
  int i=0;
  double A[6] = {1.0,2.0,1.0,-3.0,4.0,-1.0};
  double B[6] = {1.0,2.0,1.0,-3.0,4.0,-1.0};
  double C[9] = {.5,.5,.5,.5,.5,.5,.5,.5,.5};
  cblas_dgemm(CblasColMajor, CblasNoTrans, CblasTrans,3,3,2,1,A, 3, B, 3,2,C,3);

  for(i=0; i<9; i++)
    printf("%lf ", C[i]);
  printf("\n");
  return 0;
}
$ gcc -I ~/OpenBLAS/include  -L ~/OpenBLAS/lib -lopenblas main.cpp -o solver
$ ./solver
11.000000 -9.000000 5.000000 -9.000000 21.000000 -1.000000 5.000000 -1.000000 3.000000
date: 2023-01-08 21:20:37
tags:
离线安装
若计算机中的python版本为Python 3.6.8,需要安装python3.8.5
PyG is available for Python 3.7 to Python 3.10.
安装Python3.8.5
https://www.python.org/downloads/release/python-385/
tar.xz文件解压命令 tar xf
进入解压后的文件,执行安装三部曲
./configure --prefix=${HOME}/Python3.8.5
make
make install
修改.bashrc,这次不但要添加python目录到python,还需要加alias将/usr/bin/下的python3屏蔽
#Python-3.8.5
export PATH=$PATH:${HOME}/Python3.8.5/bin
alias python3=${HOME}/Python3.8.5/bin/python3
检查版本
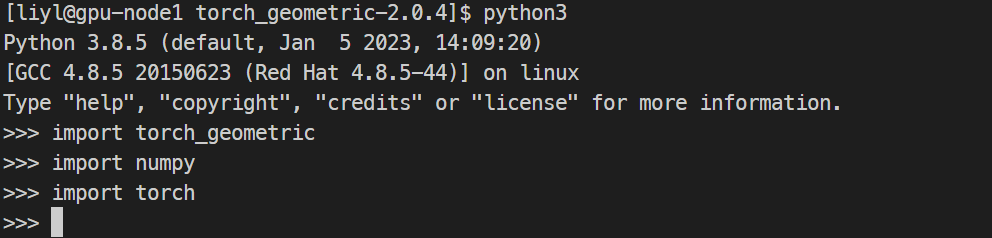
[liyl@gpu-node1 ~]$ python3
Python 3.8.5 (default, Jan  5 2023, 14:09:20)
[GCC 4.8.5 20150623 (Red Hat 4.8.5-44)] on linux
Type "help", "copyright", "credits" or "license" for more information.
>>>
安装wheel
pip3 install wheel-0.37.1-py2.py3-none-any.whl --user
安装numpy
https://pypi.org/project/numpy/1.23.5/#files numpy-1.23.5-cp38-cp38-manylinux_2_17_x86_64.manylinux2014_x86_64.whl
安装包已经放到文档目录
python3 -m pip install numpy-1.23.5-cp38-cp38-manylinux_2_17_x86_64.manylinux2014_x86_64.whl --user
--user: 安装到用户目录,不需要sudo权限,安装位置为**./.local/lib/python3.8/site-packages**
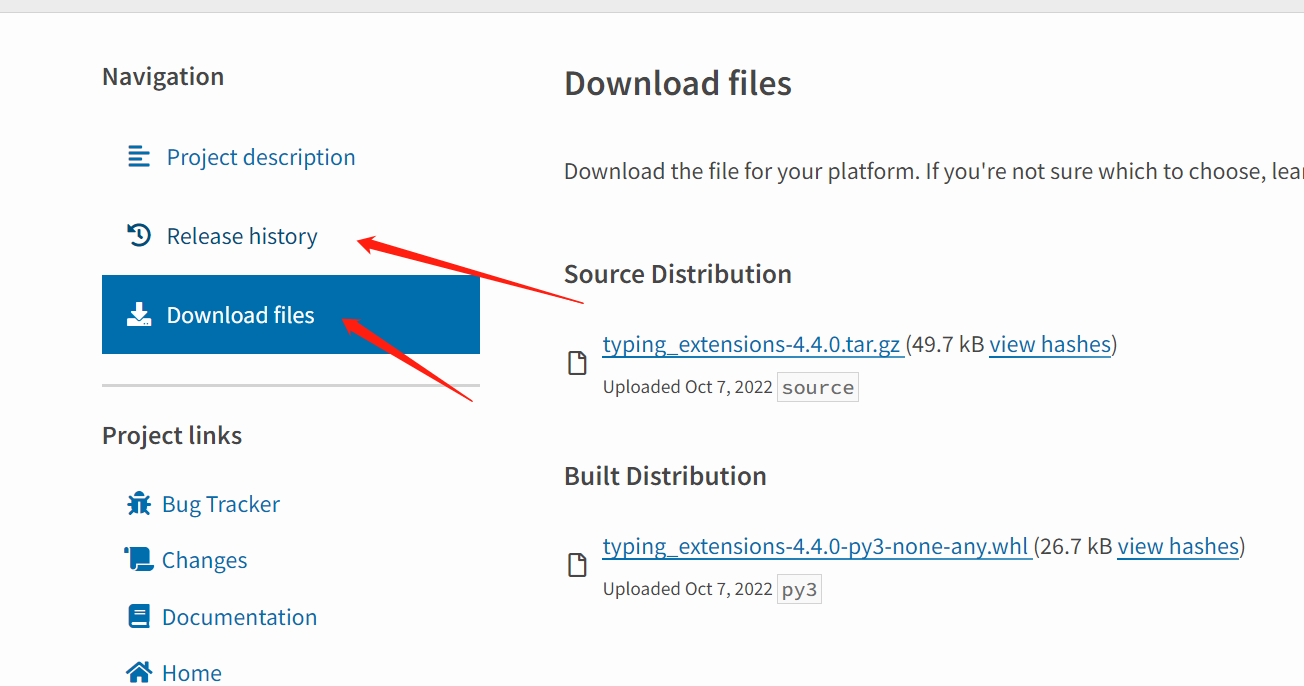
安装typing_extensions
python3 -m pip install typing_extensions-4.4.0-py3-none-any.whl --user
安装pyTorch
http://download.pytorch.org/whl/torch_stable.html
torch-1.13.1+cpu-cp38-cp38-linux_x86_64.whl
python3 -m pip install torch-1.13.1+cpu-cp38-cp38-linux_x86_64.whl --user
注意事项
安装要注意先后关系
如果给你的安装包无法安装numpy或是pyTorch,首先检查python版本和主机所属平台,可以通过以下python代码实现查询
python3 -m pip debug --verbose
我的运行结果:
Compatible tags: 87
  cp38-cp38-manylinux2014_x86_64
  cp38-cp38-manylinux2010_x86_64
  cp38-cp38-manylinux1_x86_64
  cp38-cp38-linux_x86_64
  cp38-abi3-manylinux2014_x86_64
  cp38-abi3-manylinux2010_x86_64
  cp38-abi3-manylinux1_x86_64
  cp38-abi3-linux_x86_64
  cp38-none-manylinux2014_x86_64
  cp38-none-manylinux2010_x86_64
  cp38-none-manylinux1_x86_64
  cp38-none-linux_x86_64
  cp37-abi3-manylinux2014_x86_64
  cp37-abi3-manylinux2010_x86_64
  cp37-abi3-manylinux1_x86_64
  cp37-abi3-linux_x86_64
  cp36-abi3-manylinux2014_x86_64
  cp36-abi3-manylinux2010_x86_64
  cp36-abi3-manylinux1_x86_64
  cp36-abi3-linux_x86_64
  cp35-abi3-manylinux2014_x86_64
  cp35-abi3-manylinux2010_x86_64
  cp35-abi3-manylinux1_x86_64
  cp35-abi3-linux_x86_64
  cp34-abi3-manylinux2014_x86_64
  cp34-abi3-manylinux2010_x86_64
  cp34-abi3-manylinux1_x86_64
  cp34-abi3-linux_x86_64
  cp33-abi3-manylinux2014_x86_64
  cp33-abi3-manylinux2010_x86_64
  cp33-abi3-manylinux1_x86_64
  cp33-abi3-linux_x86_64
  cp32-abi3-manylinux2014_x86_64
  cp32-abi3-manylinux2010_x86_64
  cp32-abi3-manylinux1_x86_64
  cp32-abi3-linux_x86_64
  py38-none-manylinux2014_x86_64
  py38-none-manylinux2010_x86_64
  py38-none-manylinux1_x86_64
  py38-none-linux_x86_64
  py3-none-manylinux2014_x86_64
  py3-none-manylinux2010_x86_64
  py3-none-manylinux1_x86_64
  py3-none-linux_x86_64
  py37-none-manylinux2014_x86_64
  py37-none-manylinux2010_x86_64
  py37-none-manylinux1_x86_64
  py37-none-linux_x86_64
  py36-none-manylinux2014_x86_64
  py36-none-manylinux2010_x86_64
  py36-none-manylinux1_x86_64
  py36-none-linux_x86_64
  py35-none-manylinux2014_x86_64
  py35-none-manylinux2010_x86_64
  py35-none-manylinux1_x86_64
  py35-none-linux_x86_64
  py34-none-manylinux2014_x86_64
  py34-none-manylinux2010_x86_64
  py34-none-manylinux1_x86_64
  py34-none-linux_x86_64
  py33-none-manylinux2014_x86_64
  py33-none-manylinux2010_x86_64
  py33-none-manylinux1_x86_64
  py33-none-linux_x86_64
  py32-none-manylinux2014_x86_64
  py32-none-manylinux2010_x86_64
  py32-none-manylinux1_x86_64
  py32-none-linux_x86_64
  py31-none-manylinux2014_x86_64
  py31-none-manylinux2010_x86_64
  py31-none-manylinux1_x86_64
  py31-none-linux_x86_64
  py30-none-manylinux2014_x86_64
  py30-none-manylinux2010_x86_64
  py30-none-manylinux1_x86_64
  py30-none-linux_x86_64
  cp38-none-any
  py38-none-any
  py3-none-any
  py37-none-any
  py36-none-any
  py35-none-any
  py34-none-any
  py33-none-any
  py32-none-any
  py31-none-any
  py30-none-any
根据你的打印内容选择受支持的离线安装包
https://pypi.org/project/ 在这里根据包名查包
对numpy和torch进行简单调用
import torch as t
import numpy as n
a1 = t.ones(3,3)
a2 = t.ones(3,3)
b1 = n.ones((3,3))
b2 = n.ones((3,3))
print(a1+a2)
print(b1+b2)
输出
[liyl@gpu-node1 torch]$ python3 test.py
tensor([[2., 2., 2.],
        [2., 2., 2.],
        [2., 2., 2.]])
[[2. 2. 2.]
 [2. 2. 2.]
 [2. 2. 2.]]
pyG
pytorch-geometric简称pyG
https://pytorch-geometric.com/whl/torch-1.13.0%2Bcpu.html
检索需要的版本
安装其他依赖:
python3 -m pip install --user torch_scatter-2.1.0+pt113cpu-cp38-cp38-linux_x86_64.whl
python3 -m pip install --user scipy-1.10.0-cp38-cp38-manylinux_2_17_x86_64.manylinux2014_x86_64.whl
python3 -m pip install --user torch_cluster-1.6.0+pt113cpu-cp38-cp38-linux_x86_64.whl
python3 -m pip install --user torch_sparse-0.6.16+pt113cpu-cp38-cp38-linux_x86_64.whl
python3 -m pip install --user torch_spline_conv-1.2.1+pt113cpu-cp38-cp38-linux_x86_64.whl
python3 -m pip install --user tqdm-4.64.1-py2.py3-none-any.whl
python3 -m pip install --user pytz-2022.7-py2.py3-none-any.whl
python3 -m pip install --user six-1.16.0-py2.py3-none-any.whl
python3 -m pip install --user python_dateutil-2.8.2-py2.py3-none-any.whl
python3 -m pip install --user pandas-1.5.2-cp38-cp38-manylinux_2_17_x86_64.manylinux2014_x86_64.whl
python3 -m pip install --user MarkupSafe-2.1.1-cp38-cp38-manylinux_2_17_x86_64.manylinux2014_x86_64.whl
python3 -m pip install --user Jinja2-3.1.2-py3-none-any.whl
python3 -m pip install --user certifi-2022.12.7-py3-none-any.whl
python3 -m pip install --user charset_normalizer-2.1.1-py3-none-any.whl
python3 -m pip install --user urllib3-1.26.13-py2.py3-none-any.whl
python3 -m pip install --user idna-3.4-py3-none-any.whl
python3 -m pip install --user requests-2.28.1-py3-none-any.whl
python3 -m pip install --user pyparsing-3.0.9-py3-none-any.whl
python3 -m pip install --user joblib-1.2.0-py3-none-any.whl
python3 -m pip install --user threadpoolctl-3.1.0-py3-none-any.whl
python3 -m pip install --user scikit_learn-1.2.0-cp38-cp38-manylinux_2_17_x86_64.manylinux2014_x86_64.whl
-
从源码安装torch-geometric
pyG镜像链接
https://mirrors.aliyun.com/pypi/simple/torch-geometric
cd torch_geometric-2.0.4
python3 -m pip install . --user
测试能否导入成功
date: 2022-11-27 11:11:18
tags: x11 xorg
#include <X11/Xlib.h>
#include <stdlib.h>
#include <stdio.h>
#include <unistd.h>
int main()
{
    Display *dsp = XOpenDisplay(NULL);
    if (!dsp)
    {
        return 1;
    }
    int screenNumber = DefaultScreen(dsp);
    unsigned long white = WhitePixel(dsp, screenNumber);
    unsigned long black = BlackPixel(dsp, screenNumber);

    Window win = XCreateSimpleWindow(dsp,
                                     DefaultRootWindow(dsp), //parent
                                     50, 50,   // origin point
                                     400, 400, // size
                                     0, black, // border width and color
                                     white);   // backgd
    XMapWindow(dsp, win);
    Colormap screen_colormap = DefaultColormap(dsp, DefaultScreen(dsp));
    XColor red;
    int rc = XAllocNamedColor(dsp, screen_colormap, "red", &red, &red);
    // alloc color 'red' by its name
    if (rc == 0)
    {
        fprintf(stderr, "XAllocNamedColor - failed to allocated 'red' color.\n");
        exit(1);
    }

    GC gc = XCreateGC(dsp, win, 0, NULL);
    XSetForeground(dsp, gc, black);
    XDrawLine(dsp, win, gc, 10, 10, 190, 190); //draw a line with color black
    XFlush(dsp);
    sleep(1);
    XSetForeground(dsp, gc, red.pixel); // change color for next draw
    XDrawLine(dsp, win, gc, 210, 210, 390, 390); //draw a line with color red
    XFlush(dsp);
    getchar(); // shutdown key
    XDestroyWindow(dsp, win);
    XCloseDisplay(dsp);
    return 0;
}

date: 2024-06-06 15:53:08
tags: Fortran dynamic DLL LoadLibrary
-
Source code of DLL
subroutine test(a, n)
    implicit none
    !dec$ attributes dllexport::test
    integer::n
    integer::a(n)
    integer::i
    do i = 1, n
        a(i) = i*i
    end do
end subroutine test
-
Source code of executable file
use iso_c_binding
implicit none
interface
    function LoadLibrary(name) bind(c, name='LoadLibraryA')
        import :: c_ptr, c_char
        character(kind=c_char), intent(in) :: name(*)
        type(c_ptr) :: LoadLibrary
    end function LoadLibrary

    function GetProcAddress(hModule, lpProcName) bind(c, name='GetProcAddress')
        import :: c_ptr, c_char, c_funptr
        type(c_ptr), value :: hModule
        character(kind=c_char), intent(in) :: lpProcName(*)
        type(c_funptr) :: GetProcAddress
    end function GetProcAddress

    subroutine FreeLibrary(hModule) bind(c, name='FreeLibrary')
        import :: c_ptr
        type(c_ptr), value :: hModule
    end subroutine FreeLibrary
end interface

interface
    subroutine test_interface(a,n)
        integer::n
        integer::a(n)
    end subroutine test_interface
end interface

integer, parameter::n = 5
integer::a(n)

type(c_ptr) :: funcdll
type(c_funptr) :: funcptr
procedure(test_interface), pointer :: test => null()

funcdll = LoadLibrary("./func.dll"//c_null_char)
if (.not. C_ASSOCIATED(funcdll)) then
    print *, "Failed to load DLL."
end if
funcptr = GetProcAddress(funcdll, "TEST"//c_null_char)

if (.not. C_ASSOCIATED(funcptr)) then
    print *, "Failed to load func."
end if

call c_f_procpointer(funcptr,test)

call test(a,n)
print *,a

call FreeLibrary(funcdll)
end
-
compile commands
-
generate func.dll
ifx /DLL /o func.dll func.f90 -
generate exe
ifx main.f90
-
-
console output
1 4 9 16 25
date: 2023-12-22 09:44:42
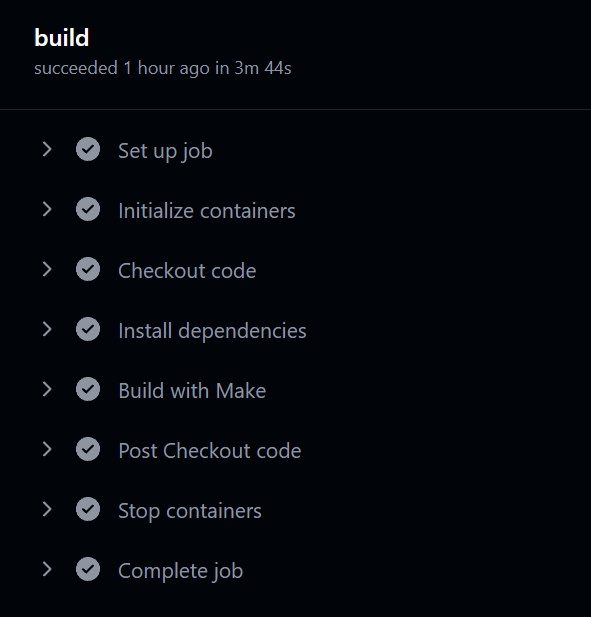
tags: cuda workflow github
Ubuntu
name: CUDA CI

on:
  pull_request:
    branches:
      - master  # 你可以根据需要调整分支

jobs:
  build:
    runs-on: ubuntu-latest
    container:
      image: nvidia/cuda:11.2.2-devel-ubuntu20.04  # 使用适合你的CUDA版本的官方NVIDIA容器

    steps:
      - name: Checkout code
        uses: actions/checkout@v2

      - name: Install dependencies
        run: |
          apt-get update
          apt-get install -y build-essential

      - name: Build with Make
        run: cd src && make
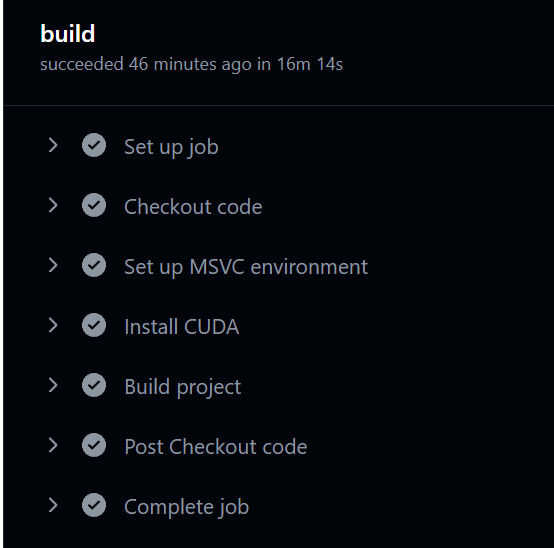
Windows
name: CUDA CI on Windows

on:
  pull_request:
    branches:
      - master

jobs:
  build:
    runs-on: windows-2019

    steps:
    - name: Checkout code
      uses: actions/checkout@v2

    - name: Set up MSVC environment
      uses: ilammy/msvc-dev-cmd@v1.13.0
      with:
        arch: x64
        vsversion: "2019"

    - name: Install CUDA
      run: |
        choco install cuda --version=11.2.2.46133

    - name: Build project
      shell: cmd
      run: |
        set PATH=%PATH%;C:\Program Files\NVIDIA GPU Computing Toolkit\CUDA\v11.2\bin
        nvcc --version
        cd src && make